In troubleshooting our Lync 2013 deployment, we were experiencing problems with the both sending and receiving calls to our Lync environment even though we believed we had voice routing and the gateway properly configured. In the OCS Logging logs and the gateway logs we were seeing the error SIP 2.0 / 503 Service Unavailable.
The resolution to the this issues was to add both the internal and external DNS entries for the FQDN of the Lync Edge pool. Making this change allowed Lync to be able to receive calls from both the legacy PBX and PSTN.
Monday, March 18, 2013


Friday, February 22, 2013
No Lync Call Park Application Service on Front End Server
During our Lync install we were trying to setup our Call Park in Lync 2013. This is configured in the administrative panel under Voice Features > Call Park. The basic setup is pretty simple but we were unable to get the FQDN of the destination server to populate.
 This ended up being because the Call Park Application Service wasn't installed on the front end servers. Even though all other services were on the server and running. After some Googling and reading through the Microsoft Technet configuration articles, I ran into the solution.
Problem: No call Park Application Service
 Solution: Ensure that the enterprise voice feature is enabled in Topology Manager. Re-Publish the topography, then rerun deployment Wizard and Setup and Remove Lync Component Services. This will install the Call Park Service on server. Start up the service after it is installed and you can add it to your Call Park.
 This ended up being because the Call Park Application Service wasn't installed on the front end servers. Even though all other services were on the server and running. After some Googling and reading through the Microsoft Technet configuration articles, I ran into the solution.
Problem: No call Park Application Service
Tuesday, February 12, 2013
Lync 2013 Reverse Proxy Configuration using IIS/ARR
Lync 2013 Reverse Proxy Configuration using IIS/ARR
In previous versions of Lync the Forefront Threat Management Gateway (TMG) was the Microsoft recommended and documented way of implementing the reverse proxy for Lync. Starting with 2013 TMG can no longer be licensed for use. It seems that the alternative to this is to use IIS/ARR to handle the reverse proxy.The following directions outline how to configure and enable IIS/ARR on a windows server 2012(GUI) Standard Edition Server. *Please note that currently we had to use the GUI because you need to use the Web Platform Installer which is not supported in Server 2012 (core) configuration. We had tried to manually install the components and something in the Web Farm Framework 1.1 doesn't correctly get added.
The reverse proxy is required for things like mobile device connectivity, meeting presentations to external contacts and dial-in users.
Machine and Enviroment Specifications/Settings
- Server 2012 Standard Gui
- 2 NICs 1 external DMZ , 1 internal DMZ
- The default gateway should be on the external nic and if using OfficeWebApps servers to be able to present PowerPoint slides it will need 2 IP addresses in that external sub-net. In our example we will be using the following:
- x.x.36.84/32 will redirect to the Lync Front End Pool
- x.x.36.88/32 will redirect to the Office Web Apps Server
- The internal DMZ will need a single address with no default gateway. Instead you will need to manually add persistent routes to all internal networks that it will need to contact. Use a command similar to the following:
- route -p ADD 192.168.0.0 Mask 255.255.0.0 (NIC IP) if (NIC#)
- Add the following example DNS entries to outside DNS if using Split-Brain DNS based on the naming conventions you choose and purchased certificates for.
- dialin.company.com A record = x.x.36.84
- meet.company.com A record = x.x.36.84
- lyncdiscover.company.com A record = x.x.36.84
- lyncwebext.company.com A record = x.x.36.84
- lyncwebapps.company.com A record = x.x.36.88
- Add the all same DNS records from above to internal DNS as follows:
- If the record pointed to x.x.36.84 point it to a CNAME of the FQDN of your lync front end pool. For example, dialing.company.com CNAME record = lyncfepool1.local.company.com
- lyncwebsapps.company.com A record = (LyncWebApps Server FQDN) lyncwebapps.local.company.com
- Install Certificates that include all used DNS Subject Alternate names. To save in costs we used the same certificates used on the Lync edge server and included all SANS in that.
- Configure Firewall Rules according to Diagram 1.
 |
| Diagram 1 |
Installation and Configuration
- Open Server Manager > Dashboard
- Choose Add roles and features > Select your Server > Add the Web Server(IIS) role
- Open the IIS Server Manager from the search or Tools dropdown.
- Open the Microsoft Web Platform Components Installer or install it if needed then open it. (You may have to temporarily turn off the extended security features and change the trust zone of *.microsoft.com.
- Search for ARR
- Choose "Application Request Routing 2.5 with KB2589179."

- This will install several other dependent items you can see in the items to be installed including the following:
- IIS URL Rewrite Module 2
- Microsoft Application Request Routing 2.5
- Microsoft External Cache Version 1 for IIS 7
- Microsoft Web Farm Framework
After installation Re-open IIS Management Tools. You should now see a "Server Farms" option under the server connection as shown in Image 2.
Image 2 - Create one empty folder to use as a physical path for the new websites for example "C:\inetpub\wwwroot\lync"
- Create 2 new websites. One for Front End Pool Services and One for Web Apps. Choose the folder created in the previous step for the Physical path. Bind both sites to HTTPS using the certificate containing SANs. Change the IP Address from :All Unassigned to the address according to what the site will proxy per above configuration. For Example, lyncWebExt site will be mapped to x.x.36.84. Leave the host name blank.
- Go to Server Farms and Create Server Farm.
- Create the LyncWebApps Farm by giving it a name
- At the Add Server screen add the full DNS name of officewebapps server. *Note this should match what you have in your Lync Topology Manager. In topology manager we used the lyncwebapps.company.com instead of the FQDN (lyncwebapps.private.domain.com) and ensure internal DNS is configured to reflect that.
- After you add the address you can expand that advanced settings and expand applicationRequestRouting. You can leave these settings to the default of 80 and 443 here.
- Click Finish
- Choose Yes to create the URL rewrite rule
- Open the Routing Rules feature under the farm you just created.
- Ensure both "Use URL Rewrite to inspect incoming requests" and "Enable SSL offloading" and checked
- On the right under Advanced Routing choose URL Rewrite
- Modify the pattern of the rule to match m/*
- Change the Scheme to HTTPS://
- Check to Stop processing of Subsequent Rules.
- Create a new rule and repeat the options above expect have it match the pattern of p/*. This will allow PowerPoint Presentations to work.
- Create a new LyncWebExt Farm and point it to you LyncFrontEnd pool FQDN.
- After you add the address you can expand that advanced settings and expand applicationRequestRouting. Change port 80 to port 8080 and change port 443 to 4443.
- Click Finish
- Choose Yes to have the rule created.
- In the Routing Rules > Advanced Routing > URL Rewrite
- Change the scheme to HTTPS://
- When finished your URL Rewrite should look like Image 3.
- Optional: For some additional security you can add a blank default HTML page to the default web site.

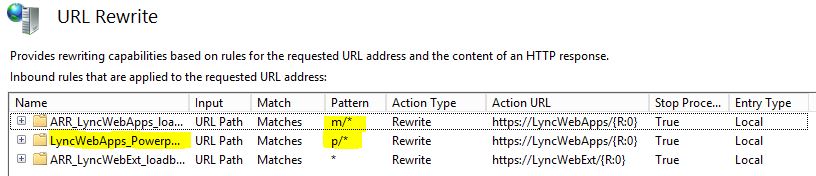 |
| Image 3 |
Troubleshooting/Testing
To troubleshoot the configuration for officewebapps you can try and visit https://lyncwebapps.company.com/hosting/discovery. If successful, you should see XML output. If you are on an internal network, either change your test machines DNS servers or your host files to point to the external interfaces.
Tuesday, February 5, 2013
Lync Enterprise 2013 Front End Service not Starting

Scenerio: This problem seems to occur if you are deploying a single Lync 2013 Front End server on Windows server 2012. GoogleFu seems to point toward this being an SChannel or certificate issue. This was not the issue for.
Resolution: It appears that Lync 2013 enterprise that requires you to have 2 front end servers. Once we added the 2nd front end server to the Lync topology the front end service on both servers started with no issues. In taking with Lync 2013 experts, it appears that something has changed with the Fabric Model in 2013 that requires redundancy from the start instead of being able to add it after the fact.
Monday, October 8, 2012
Change UserPrincipalName with Script via Powershell
When setting up single sign on in Office 365, one problem you may run into is needing to change the UserPrincipalName to match your public mail domain. For example, if your primary Active Directory Domain is something like @domain.local it will not work with Office 365 and you will need to change the UserPrincipalName to @domain.com.
After you have created the alternate UPN as described in http://techatmount.blogspot.com/2012/09/office-365-single-sign-on-errors.html, you can script the change the of UPN of users to a different UPN using the following powershell script.
I played around with the formatting of the code below to get it nicely color coded. This means that some of the line breaks don't show well here, but a copy and a paste into notepad should format it properly.
After you have created the alternate UPN as described in http://techatmount.blogspot.com/2012/09/office-365-single-sign-on-errors.html, you can script the change the of UPN of users to a different UPN using the following powershell script.
I played around with the formatting of the code below to get it nicely color coded. This means that some of the line breaks don't show well here, but a copy and a paste into notepad should format it properly.
Import-Module ActiveDirectory
$privateUPN = 'domain.local'
$publicUPN = 'domain.edu'
Get-ADUser -SearchBase "ou=Students,dc=domain,dc=com" -SearchScope SubTree -filter * |
ForEach-Object {if ($_.UserPrincipalName){#Checks if the UserPrincipalName is null
 $newUserName = $_.UserPrincipalName.Replace($privateUPN,$publicUPN) #Changes the UPN and sets the new name to a variable
 <# The following is to output extra details for troubleshooting  : Note the line continuation is a back tick#>
 #Write-Host $_.UserPrincipalName " now is " $newUserName -ForegroundColor DarkRed `
 $_ | Set-ADUser -Server $privateUPN -UserPrincipalName $newUserName <#-WhatIf#>}#The whatif commands doesn't actaully change anything remove it to make the change.
 else {Write-Host $_.sAMAccountName + " does not have a UPN" -ForegroundColor DarkCyan}
 #{$newUserName = $_.UserPrincipalName.Replace($privateUPN,$publicUPN))}
 }
Friday, October 5, 2012
GroupPrincipal.FindbyIndentity Search returns Well Known SID Error
We use a custom program to assist in the creation and management of our Active Directory User Accounts. In this we use the DirectoryServices.AccountManagement namespace released in .net 3.5 to do much of the interaction with AD.
One of the processes that gets completed is to find what groups a user should be in based on their department and add the user to that group.
In doing this, I use the following code to search for the group based on their name.
We would also receive the following error when trying to create the user account.

The solution to the problem was actually pretty quick.
Change
group = GroupPrincipal.FindByIdentity(domainContext, Me.Department)
to
group = GroupPrincipal.FindByIdentity(domainContext, IdentityType.SamAccountName, Me.Department)
so you are only searching against the sAMAccountName or you can choose a different IdentityType to search against. The options include
One of the processes that gets completed is to find what groups a user should be in based on their department and add the user to that group.
In doing this, I use the following code to search for the group based on their name.
Dim domainContext As PrincipalContextdomainContext = New PrincipalContext(ContextType.Domain, "campus", "OU=" & Me.Department & ",OU=" & Me.accountType & ",DC=domain,DC=com")Dim group As GroupPrincipalgroup = GroupPrincipal.FindByIdentity(domainContext, Me.Department)
Problem
A problem arose while searching for some of our departments. For example our Communications department is identified as 'CO' and our Education department is identified as 'ED'. When we searched for the value 'CO' assigned to Me.Department, the identity found was the well known SID "Creator Owner." When we would search for 'ED', the group found was "Enterprise Domain Controllers" instead of the expected group 'ED'.We would also receive the following error when trying to create the user account.
This principal object represents a well-known SID and does not correspond to an actual store object. This operation is not supported on it.

Solution
The solution to the problem was actually pretty quick.
Change
group = GroupPrincipal.FindByIdentity(domainContext, Me.Department)
to
group = GroupPrincipal.FindByIdentity(domainContext, IdentityType.SamAccountName, Me.Department)
so you are only searching against the sAMAccountName or you can choose a different IdentityType to search against. The options include
- DistinguishedName
- Guid
- sAMAccountName
- Name
- Sid
- UserPrincipalName
Additionally trying to catch the MultipleMatchesException did not resolve the problem because it was never thrown during the search process.
Hopefully this will help save some searching.
Wednesday, October 3, 2012
Spear Phishing Attempts
We have recently been receiving several different types of spear phishing attempts. These messages contain customized institutional headers and information of interest specific to the users they were sent to. For example, fake recruiting information was sent to admissions and vice presidents.


We have notified users of the phishing emails and tried to sink hole the DNS addresses.


We have notified users of the phishing emails and tried to sink hole the DNS addresses.
Subscribe to:
Posts (Atom)