Friday, December 19, 2014
Palo Alto Response pages and how they react using SSL/TLS
This link is a post to the palo alto document I created to outline response pages and what happens with SSL applications.


Friday, April 4, 2014
Setup a Read Only Active Directory Administrator in the Palo Alto
This document will
outline how to create an active directory administrator account on the device
that can log in and view reports and the
ACC.
This document will
not outline creating an LDAP, Kerberos, or RADIUS server profile which you will
require.
Step 1: Create an
authentication profile to allow the AD user to authenticate. This is done at
Device > Authentication Profile. Click add and in the allow list remove All
and add the users that you want to give read only permissions. Choose the
Authentication type and server profile to match the authentication type. You
also should change Login Attribute to sAMAccountName.

Step 2: Go to Admin
Roles in Device >Admin Roles. Add a new one disabling the features you don't
want the user to have access to. For our
example only the ACC and the features in the Monitor tab are left enabled everything
else is disabled.

Step 3: Go to
Administrators in Device > Administrators and create a new Administrator
account that keys off of the users defined in the Authentication Profile you
created. Choose the authentication
profile created then choose Role Based and the new Admin Role you created in
the Profile section.

Step 4: Commit
Step 5: Have the
user login with their Active Directory account.

Results: The user should now see limited actions and
only a few tabs. In our case ACC and Monitor at which point the user can see
any reports and information that they wish without having the ability to make
changes.

Friday, November 15, 2013
Sonicwall to Palo Alto Networks VPN Configuration
Sonicwall to Palo Alto Networks VPN configuration
Overview:
This document will outline the basic steps involved in establishing an IPSec Site to Site VPN tunnel between a Palo Alto Networks (PAN) and a Sonicwall. This document is also assuming the Sonicwall has a dynamic DHCP address it will be connecting from like you might have in a home or small office location.The Sonicwall device used is a TZ 170. The firmware versions used in the document are:
- PAN-OS version 5.0.8
- SonicOS Standard 3.1.2.6-97s
On the Palo Alto Device
- Navigate to the Network tab >IKE Gateways (click "new"):

- Enter the remote Gateway Name, local interface and IP, Choose Dynamic Peer Type since the peer has a DCHP address, otherwise you could enter a Peer Address, also enter a Pre-Shared Key that will match the other side. Since we are using a Dynamic peer you will need to enter a peer identification. Choose User FQDN(email address) and add an email address.
- You can leave the advanced Phase 1 options at there defaults.
- Go to the tab Networks > Interface > Tunnel and click Add on the bottom of the screen to create a new tunnel.
- Add an unused Tunnel id number, Assign it to a security zone, in this case the Trust zone and a virtual router.
- Go to the tab Networks > IPSec Tunnels and click add.
- On the general tab assign a tunnel name, choose the tunnel interface you created and choose the IKE Gateway you created from above.

- Click on the Proxy IDs tab. Click add and enter a Proxy ID name, a local IP netmask, the remote IP netmask and Any protocol.
- Go to the tab Network > Virtual Routers. On the general tab, add the Tunnel interface you create and ensure the used ethernet interfaces are added.

- Click on the Static Routes tab and add a static route for the remote network. Assign the remote network subnet and mask in destination. For interface choose the tunnel you created, and choose Next Hop of None.

- Go to Policies > Security and create the needed policy rules to setup the tunnels and then allow traffic through the tunnel.

- Commit the changes


On the Sonicwall
- Navigate to VPN > Settings
- Check the Enable VPN checkbox and add the Unique Firewall Identifier. Make the Unique firewall identifier be the User FQDN you used in the peer identifier on the Palo Alto.

- In the VPN Policies, Click Add to Create a new VPN policy.

- For the IPSec Keying Mode choose IKE using Preshared Secret, assign a name, assign the IPSec primary gateway Name or Address as the Palo Alto's interface, assign the matching shared secret.
- In the destination networks, we are assigning a specific network so only traffic headed to the assigned subnet will pass over the VPN.
- In the proposals tab, you want to choose aggressive exchange mode so this tried to initiate connections. All the other settings here need to match want you have in the IKE Crypto and IPSec Crypto sections of the Palo Alto. You need to check the Enable Perfect Forward Secrecy Box. I believe all the other settings are default matches on both sides.

- In the Advanced tab, check the box to Enable Keep Alive and ensure the VPN terminated option is set to LAN.


For additional troubleshooting see the following documents on the palo alto support site. https://live.paloaltonetworks.com/docs/DOC-1163
Monday, April 1, 2013
No Ringback from PSTN to Lync via Audiocodes Gateway
Problem:
We had an issue where when calling a Lync phone from our PSTN with a Mediant 1000 Audiocodes device between Lync and the PSTN we were unable to hear ringback tones from the Lync device on the PSTN phone.Answer:
This problem is one of those issue were there was 1 drop down option that needed changed to resolve it.On the Audiocodes Gateway, go to Configuration > Full > SIP Definitions > General Parameters.
Go to the option Playback Tone to Tel and change it to Play Local Until Remote Media Arrives. Click Submit.
Monday, March 18, 2013
Lync 2013 Unable to receive SIP calls 503 Service Unavailable
In troubleshooting our Lync 2013 deployment, we were experiencing problems with the both sending and receiving calls to our Lync environment even though we believed we had voice routing and the gateway properly configured. In the OCS Logging logs and the gateway logs we were seeing the error SIP 2.0 / 503 Service Unavailable.
The resolution to the this issues was to add both the internal and external DNS entries for the FQDN of the Lync Edge pool. Making this change allowed Lync to be able to receive calls from both the legacy PBX and PSTN.
The resolution to the this issues was to add both the internal and external DNS entries for the FQDN of the Lync Edge pool. Making this change allowed Lync to be able to receive calls from both the legacy PBX and PSTN.
Friday, February 22, 2013
No Lync Call Park Application Service on Front End Server
During our Lync install we were trying to setup our Call Park in Lync 2013. This is configured in the administrative panel under Voice Features > Call Park. The basic setup is pretty simple but we were unable to get the FQDN of the destination server to populate.
 This ended up being because the Call Park Application Service wasn't installed on the front end servers. Even though all other services were on the server and running. After some Googling and reading through the Microsoft Technet configuration articles, I ran into the solution.
Problem: No call Park Application Service
 Solution: Ensure that the enterprise voice feature is enabled in Topology Manager. Re-Publish the topography, then rerun deployment Wizard and Setup and Remove Lync Component Services. This will install the Call Park Service on server. Start up the service after it is installed and you can add it to your Call Park.
 This ended up being because the Call Park Application Service wasn't installed on the front end servers. Even though all other services were on the server and running. After some Googling and reading through the Microsoft Technet configuration articles, I ran into the solution.
Problem: No call Park Application Service
Tuesday, February 12, 2013
Lync 2013 Reverse Proxy Configuration using IIS/ARR
Lync 2013 Reverse Proxy Configuration using IIS/ARR
In previous versions of Lync the Forefront Threat Management Gateway (TMG) was the Microsoft recommended and documented way of implementing the reverse proxy for Lync. Starting with 2013 TMG can no longer be licensed for use. It seems that the alternative to this is to use IIS/ARR to handle the reverse proxy.The following directions outline how to configure and enable IIS/ARR on a windows server 2012(GUI) Standard Edition Server. *Please note that currently we had to use the GUI because you need to use the Web Platform Installer which is not supported in Server 2012 (core) configuration. We had tried to manually install the components and something in the Web Farm Framework 1.1 doesn't correctly get added.
The reverse proxy is required for things like mobile device connectivity, meeting presentations to external contacts and dial-in users.
Machine and Enviroment Specifications/Settings
- Server 2012 Standard Gui
- 2 NICs 1 external DMZ , 1 internal DMZ
- The default gateway should be on the external nic and if using OfficeWebApps servers to be able to present PowerPoint slides it will need 2 IP addresses in that external sub-net. In our example we will be using the following:
- x.x.36.84/32 will redirect to the Lync Front End Pool
- x.x.36.88/32 will redirect to the Office Web Apps Server
- The internal DMZ will need a single address with no default gateway. Instead you will need to manually add persistent routes to all internal networks that it will need to contact. Use a command similar to the following:
- route -p ADD 192.168.0.0 Mask 255.255.0.0 (NIC IP) if (NIC#)
- Add the following example DNS entries to outside DNS if using Split-Brain DNS based on the naming conventions you choose and purchased certificates for.
- dialin.company.com A record = x.x.36.84
- meet.company.com A record = x.x.36.84
- lyncdiscover.company.com A record = x.x.36.84
- lyncwebext.company.com A record = x.x.36.84
- lyncwebapps.company.com A record = x.x.36.88
- Add the all same DNS records from above to internal DNS as follows:
- If the record pointed to x.x.36.84 point it to a CNAME of the FQDN of your lync front end pool. For example, dialing.company.com CNAME record = lyncfepool1.local.company.com
- lyncwebsapps.company.com A record = (LyncWebApps Server FQDN) lyncwebapps.local.company.com
- Install Certificates that include all used DNS Subject Alternate names. To save in costs we used the same certificates used on the Lync edge server and included all SANS in that.
- Configure Firewall Rules according to Diagram 1.
 |
| Diagram 1 |
Installation and Configuration
- Open Server Manager > Dashboard
- Choose Add roles and features > Select your Server > Add the Web Server(IIS) role
- Open the IIS Server Manager from the search or Tools dropdown.
- Open the Microsoft Web Platform Components Installer or install it if needed then open it. (You may have to temporarily turn off the extended security features and change the trust zone of *.microsoft.com.
- Search for ARR
- Choose "Application Request Routing 2.5 with KB2589179."

- This will install several other dependent items you can see in the items to be installed including the following:
- IIS URL Rewrite Module 2
- Microsoft Application Request Routing 2.5
- Microsoft External Cache Version 1 for IIS 7
- Microsoft Web Farm Framework
After installation Re-open IIS Management Tools. You should now see a "Server Farms" option under the server connection as shown in Image 2.
Image 2 - Create one empty folder to use as a physical path for the new websites for example "C:\inetpub\wwwroot\lync"
- Create 2 new websites. One for Front End Pool Services and One for Web Apps. Choose the folder created in the previous step for the Physical path. Bind both sites to HTTPS using the certificate containing SANs. Change the IP Address from :All Unassigned to the address according to what the site will proxy per above configuration. For Example, lyncWebExt site will be mapped to x.x.36.84. Leave the host name blank.
- Go to Server Farms and Create Server Farm.
- Create the LyncWebApps Farm by giving it a name
- At the Add Server screen add the full DNS name of officewebapps server. *Note this should match what you have in your Lync Topology Manager. In topology manager we used the lyncwebapps.company.com instead of the FQDN (lyncwebapps.private.domain.com) and ensure internal DNS is configured to reflect that.
- After you add the address you can expand that advanced settings and expand applicationRequestRouting. You can leave these settings to the default of 80 and 443 here.
- Click Finish
- Choose Yes to create the URL rewrite rule
- Open the Routing Rules feature under the farm you just created.
- Ensure both "Use URL Rewrite to inspect incoming requests" and "Enable SSL offloading" and checked
- On the right under Advanced Routing choose URL Rewrite
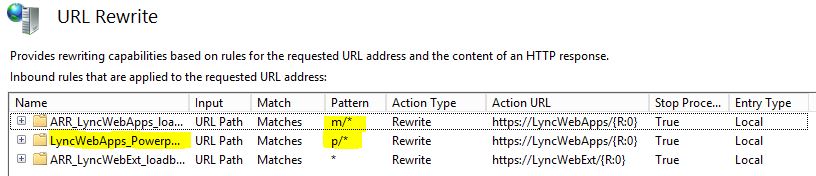
- Modify the pattern of the rule to match m/*
- Change the Scheme to HTTPS://
- Check to Stop processing of Subsequent Rules.
- Create a new rule and repeat the options above expect have it match the pattern of p/*. This will allow PowerPoint Presentations to work.
- Create a new LyncWebExt Farm and point it to you LyncFrontEnd pool FQDN.
- After you add the address you can expand that advanced settings and expand applicationRequestRouting. Change port 80 to port 8080 and change port 443 to 4443.
- Click Finish
- Choose Yes to have the rule created.
- In the Routing Rules > Advanced Routing > URL Rewrite
- Change the scheme to HTTPS://
- When finished your URL Rewrite should look like Image 3.
- Optional: For some additional security you can add a blank default HTML page to the default web site.

 |
| Image 3 |
Troubleshooting/Testing
To troubleshoot the configuration for officewebapps you can try and visit https://lyncwebapps.company.com/hosting/discovery. If successful, you should see XML output. If you are on an internal network, either change your test machines DNS servers or your host files to point to the external interfaces.
Tuesday, February 5, 2013
Lync Enterprise 2013 Front End Service not Starting

Scenerio: This problem seems to occur if you are deploying a single Lync 2013 Front End server on Windows server 2012. GoogleFu seems to point toward this being an SChannel or certificate issue. This was not the issue for.
Resolution: It appears that Lync 2013 enterprise that requires you to have 2 front end servers. Once we added the 2nd front end server to the Lync topology the front end service on both servers started with no issues. In taking with Lync 2013 experts, it appears that something has changed with the Fabric Model in 2013 that requires redundancy from the start instead of being able to add it after the fact.
Monday, October 8, 2012
Change UserPrincipalName with Script via Powershell
When setting up single sign on in Office 365, one problem you may run into is needing to change the UserPrincipalName to match your public mail domain. For example, if your primary Active Directory Domain is something like @domain.local it will not work with Office 365 and you will need to change the UserPrincipalName to @domain.com.
After you have created the alternate UPN as described in http://techatmount.blogspot.com/2012/09/office-365-single-sign-on-errors.html, you can script the change the of UPN of users to a different UPN using the following powershell script.
I played around with the formatting of the code below to get it nicely color coded. This means that some of the line breaks don't show well here, but a copy and a paste into notepad should format it properly.
After you have created the alternate UPN as described in http://techatmount.blogspot.com/2012/09/office-365-single-sign-on-errors.html, you can script the change the of UPN of users to a different UPN using the following powershell script.
I played around with the formatting of the code below to get it nicely color coded. This means that some of the line breaks don't show well here, but a copy and a paste into notepad should format it properly.
Import-Module ActiveDirectory
$privateUPN = 'domain.local'
$publicUPN = 'domain.edu'
Get-ADUser -SearchBase "ou=Students,dc=domain,dc=com" -SearchScope SubTree -filter * |
ForEach-Object {if ($_.UserPrincipalName){#Checks if the UserPrincipalName is null
 $newUserName = $_.UserPrincipalName.Replace($privateUPN,$publicUPN) #Changes the UPN and sets the new name to a variable
 <# The following is to output extra details for troubleshooting  : Note the line continuation is a back tick#>
 #Write-Host $_.UserPrincipalName " now is " $newUserName -ForegroundColor DarkRed `
 $_ | Set-ADUser -Server $privateUPN -UserPrincipalName $newUserName <#-WhatIf#>}#The whatif commands doesn't actaully change anything remove it to make the change.
 else {Write-Host $_.sAMAccountName + " does not have a UPN" -ForegroundColor DarkCyan}
 #{$newUserName = $_.UserPrincipalName.Replace($privateUPN,$publicUPN))}
 }
Friday, October 5, 2012
GroupPrincipal.FindbyIndentity Search returns Well Known SID Error
We use a custom program to assist in the creation and management of our Active Directory User Accounts. In this we use the DirectoryServices.AccountManagement namespace released in .net 3.5 to do much of the interaction with AD.
One of the processes that gets completed is to find what groups a user should be in based on their department and add the user to that group.
In doing this, I use the following code to search for the group based on their name.
We would also receive the following error when trying to create the user account.

The solution to the problem was actually pretty quick.
Change
group = GroupPrincipal.FindByIdentity(domainContext, Me.Department)
to
group = GroupPrincipal.FindByIdentity(domainContext, IdentityType.SamAccountName, Me.Department)
so you are only searching against the sAMAccountName or you can choose a different IdentityType to search against. The options include
One of the processes that gets completed is to find what groups a user should be in based on their department and add the user to that group.
In doing this, I use the following code to search for the group based on their name.
Dim domainContext As PrincipalContextdomainContext = New PrincipalContext(ContextType.Domain, "campus", "OU=" & Me.Department & ",OU=" & Me.accountType & ",DC=domain,DC=com")Dim group As GroupPrincipalgroup = GroupPrincipal.FindByIdentity(domainContext, Me.Department)
Problem
A problem arose while searching for some of our departments. For example our Communications department is identified as 'CO' and our Education department is identified as 'ED'. When we searched for the value 'CO' assigned to Me.Department, the identity found was the well known SID "Creator Owner." When we would search for 'ED', the group found was "Enterprise Domain Controllers" instead of the expected group 'ED'.We would also receive the following error when trying to create the user account.
This principal object represents a well-known SID and does not correspond to an actual store object. This operation is not supported on it.

Solution
The solution to the problem was actually pretty quick.
Change
group = GroupPrincipal.FindByIdentity(domainContext, Me.Department)
to
group = GroupPrincipal.FindByIdentity(domainContext, IdentityType.SamAccountName, Me.Department)
so you are only searching against the sAMAccountName or you can choose a different IdentityType to search against. The options include
- DistinguishedName
- Guid
- sAMAccountName
- Name
- Sid
- UserPrincipalName
Additionally trying to catch the MultipleMatchesException did not resolve the problem because it was never thrown during the search process.
Hopefully this will help save some searching.
Wednesday, October 3, 2012
Spear Phishing Attempts
We have recently been receiving several different types of spear phishing attempts. These messages contain customized institutional headers and information of interest specific to the users they were sent to. For example, fake recruiting information was sent to admissions and vice presidents.


We have notified users of the phishing emails and tried to sink hole the DNS addresses.


We have notified users of the phishing emails and tried to sink hole the DNS addresses.
Thursday, September 20, 2012
Office 365 Single Sign On Errors
 |
| Figure 1 |
To enable SSO you need the following items.
- Properly configured ADFS or Active Directory Federated Services Environment
- Office 365 domain with verified Public Domain i.e. domain.edu
- Follow instructions from a blog like this to enable SSO
If you have completed these steps, you should be able verify the ADFS setup by visiting the URL https://adfs.domain.com/adfs/ls/IdpInitiatedSignon.aspx from a variety of places both internal and external clients.
To test Single Sign-On for Office 365 go to https://portal.microsoftonline.com. You should try to login with username@domain.com and it will change your to a page similar to Figure 1. When you click on the Sign in at domain.com link, it should redirect to your ADFS environment and either login you in automatically or prompt for credentials based on configuration, current user credentials, and browser.

If you enter your credentials and receive the following error, "Your organization could not sign you into this service" as shown in the image, the solution is most likely related to the UPN that is currently configured in Active Directory. The UPN for the user that is attempting to login needs to match that user's UPN in AD. This is typically an issue when you are using a private internal domain name such as domain.local.
Solution
First you need to add the UPN if it doesn't currently exists in AD.
- Open Active Directory Domains and Trusts
- Right click on the top item Active Directory Domains and Trusts and choose Properties.
- Add your alternate UPN public UPN suffix. i.e. domain.com
- Open the properties of the user you are testing.
- Go to the Account tab.
- Under User logon name: change the drop down item to the new @domain.com name.
WARNING: This may affect other things if you have people using the private UPN to login elsewhere, so be careful.
Wednesday, September 5, 2012
4 Ways to Protect Your Mobile Device
Afraid of losing or having your device stolen?
Worried about people getting information or pictures off of your device?
Read on to find out 4 quick and simple ways you can protect your device and yourself from a loss of phone and your privacy.
1. Sign up for and install a device locating App
On iOS devices including iPods, iPads, and iPhones the most common and free App to use is Find My iPhone. By installing this App on your device and tying it to your AppleID you will be able to see where your device is at any time as long as it is enabled and connected to a network such as cellular or Wifi.
It is important to note the just like when you are using your phone the specificity of the location is affected by things like whether your GPS or other location services are enabled, where the more stuff you keep turned on the more accurate the location will be.
This app also allows you to ping your device making it beep, if for example you lost it somewhere in your room.
Android has several similar types of software. The one currently recommended is SeekDroid. This freemium software in its free mode allows you to do similar location finding features as Find My iPhone. Premium additional features are available depending on your needs.
 2. Password protect your device
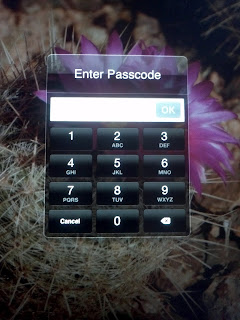
A password or lock screen on your device is your first line of defense in preventing anyone be they friend or foe from accessing your device. Why does it matter if someone can access your device? A quick look at what we all keep on these devices helps to answer that. Would you want someone posting as you to your facebook or twitter account.
How about photos that you may have taken? Do you have any photos you wouldn't want to be displayed on the front of the newspaper? While it isn't a good idea to take such photos in the first place, as a quick look at celebrities that have recently had their phones broken into and regretted the results demonstrates. Keeping these pictures on your device without locking it is asking for trouble.
To make matters even worse most of the time our devices contain lots of information about us that can be used for identity theft. Things like account numbers, banks cached credentials and contact information that can be used to pretend someone is us.
So how should you protect your device with a password? On iOS the easiest solution is to choose a minimum of a 4 digit PIN number that isn't repeating or simple. For example, bad PINs are things like 1234, 1111, or 5555.
On android devices I recommend also using a minimum of a 4 digit PIN. The swipe code is generally not a good protection mechanism because it is easy to see the fingerprint trail on the screen.
3. Encrypt your device
The good news for iOS users is encryption happens automatically if you have a password on the device in all newer versions of iOS. If you have an old Apple device, you should upgrade the iOS version and then enable a password to secure the device.
On Android devices the risks from an unencrypted devices are even greater because of the access to the file system via USB. Due to the variety of devices and vendors, to find out how exactly to encrypt your specific device it is recommended that you Google it; however it will typically be in the Settings > Security options.
4. Record your Device's Information
If your device does get lost or stolen, you should have as much information about it as possible. This would include numbers like your ASN/IMEI or SIM number, your MAC address, model number and any other distinguishing features such as marks, or damage. All of this information will assist law enforcement in verifying or returning your device.
In iOS you can get this information by going to Settings > General > About.
On Android devices this is generally available by going to Settings > About device > Status.
With these steps in place you are on your way to protecting a tool that has become an important part of our daily lives.
Worried about people getting information or pictures off of your device?
Read on to find out 4 quick and simple ways you can protect your device and yourself from a loss of phone and your privacy.
1. Sign up for and install a device locating App
On iOS devices including iPods, iPads, and iPhones the most common and free App to use is Find My iPhone. By installing this App on your device and tying it to your AppleID you will be able to see where your device is at any time as long as it is enabled and connected to a network such as cellular or Wifi.
It is important to note the just like when you are using your phone the specificity of the location is affected by things like whether your GPS or other location services are enabled, where the more stuff you keep turned on the more accurate the location will be.
This app also allows you to ping your device making it beep, if for example you lost it somewhere in your room.
Android has several similar types of software. The one currently recommended is SeekDroid. This freemium software in its free mode allows you to do similar location finding features as Find My iPhone. Premium additional features are available depending on your needs.
 2. Password protect your device
A password or lock screen on your device is your first line of defense in preventing anyone be they friend or foe from accessing your device. Why does it matter if someone can access your device? A quick look at what we all keep on these devices helps to answer that. Would you want someone posting as you to your facebook or twitter account.
How about photos that you may have taken? Do you have any photos you wouldn't want to be displayed on the front of the newspaper? While it isn't a good idea to take such photos in the first place, as a quick look at celebrities that have recently had their phones broken into and regretted the results demonstrates. Keeping these pictures on your device without locking it is asking for trouble.
To make matters even worse most of the time our devices contain lots of information about us that can be used for identity theft. Things like account numbers, banks cached credentials and contact information that can be used to pretend someone is us.
So how should you protect your device with a password? On iOS the easiest solution is to choose a minimum of a 4 digit PIN number that isn't repeating or simple. For example, bad PINs are things like 1234, 1111, or 5555.
On android devices I recommend also using a minimum of a 4 digit PIN. The swipe code is generally not a good protection mechanism because it is easy to see the fingerprint trail on the screen.
3. Encrypt your device
The good news for iOS users is encryption happens automatically if you have a password on the device in all newer versions of iOS. If you have an old Apple device, you should upgrade the iOS version and then enable a password to secure the device.
On Android devices the risks from an unencrypted devices are even greater because of the access to the file system via USB. Due to the variety of devices and vendors, to find out how exactly to encrypt your specific device it is recommended that you Google it; however it will typically be in the Settings > Security options.
4. Record your Device's Information
If your device does get lost or stolen, you should have as much information about it as possible. This would include numbers like your ASN/IMEI or SIM number, your MAC address, model number and any other distinguishing features such as marks, or damage. All of this information will assist law enforcement in verifying or returning your device.
In iOS you can get this information by going to Settings > General > About.
On Android devices this is generally available by going to Settings > About device > Status.
With these steps in place you are on your way to protecting a tool that has become an important part of our daily lives.
Wednesday, June 20, 2012
Putting Voicemail on Exchange 2010
A major driver for our upgrade to Exchange 2010 is to migrate voice-mail off of our Nortel CS1000 system that currently uses Callpilot to having voice-mail handled by Exchange's Unified Messaging features.
The push for this was the continued expanse of upgrading the Call Pilot voicemail system while receiving no new functionality. By moving voicemail to be handled by exchange we ended up spending a little less than 1/3 of the call pilot cost while receiving several new features.
For this upgrade we received assistance from the Via Group. The designed the upgrade process and handled the work on the Audiocodes device, as well as providing UM and Exchange Assistance as required.
The basic concept for getting Voicemail to to exchange was the following:
-*Prereq. - Have Exchange installed with a server that has the UM role.
The push for this was the continued expanse of upgrading the Call Pilot voicemail system while receiving no new functionality. By moving voicemail to be handled by exchange we ended up spending a little less than 1/3 of the call pilot cost while receiving several new features.
For this upgrade we received assistance from the Via Group. The designed the upgrade process and handled the work on the Audiocodes device, as well as providing UM and Exchange Assistance as required.
The basic concept for getting Voicemail to to exchange was the following:
-*Prereq. - Have Exchange installed with a server that has the UM role.
 |
| Voicemail in Exchange instead of Nortel - Basic Configuration |
- Purchase an AudioCodes Gateway device that essentially acts as a go between for the Analog Nortel Switch and the Exchange UM server.
- We previously had 4 ISDN Line's as our PRIs from the PTSN. This allowed a maximum of 92 concurrent Incoming or Outgoing calls.
- We moved one of these PRI's to connect to the AudioCodes Device as a QSIG Trunk, provided a capacity of 23 concurrent connections to the new voicemail server, that leaves 69 concurrent calls allowed in or out of campus.
- Create the Dial Plans and Policy inside of Exchange Unified Messaging. If you are looking for a good walk-through on this refer to here.
- Concerning Certificates, we have an enterprise CA that we used to sign the certificate on both the AudioCodes Device and for the UM role in Exchange.
- Note: Both these devices will need to use the FQDN of the UM server and the DNS address you create for audiocodes gateway. This allows them to do TLS encryption between devices. If you follow this route you will also need to install the root certificates on the AudioCodes Devices - Assign Mailboxes to phone numbers in Exchange
- Ensure Receive Connectors on 2010 CAS are able to accept messages from the UM. (More on this below)
- Voicemails not being received in Exchange from "Unauthenticated Callers" ( An unauthenticated caller is anyone whose phone is not in the UM. This means numbers outside the organization and anyone on the legacy Nortel system.)
- Error Messages included the voicemails collecting in InstallDrive:\\Program Files\Microsoft\Exchange Server\V14\UnifiedMessaging\voicemail.
- In the windows application log we were also seeing the following:
The Unified Messaging server encountered an error while trying to process the message with header file "C:\Program Files\Microsoft\Exchange Server\V14\UnifiedMessaging\voicemail\53fd3299-40b3-42d2-bf02-02b09edacf1f.txt". Error details: "Microsoft.Exchange.UM.UMCore.SmtpSubmissionException: Submission to the Hub Transport server failed. The operation will be retried. ---> Microsoft.Exchange.Net.ExSmtpClient.UnexpectedSmtpServerResponseException: Unexpected SMTP server response. Expected: 220, actual: 500, whole response: 500 5.3.3 Unrecognized command
at Microsoft.Exchange.Net.ExSmtpClient.SmtpTalk.CheckResponse(ServerResponseInfo response, Int32 expectedCode)
at Microsoft.Exchange.Net.ExSmtpClient.SmtpTalk.Command(SmtpChunk[] chunks, SmtpCommandType command, Int32 expectedCode)
at Microsoft.Exchange.Net.ExSmtpClient.SmtpTalk.StartTls()
at Microsoft.Exchange.Net.ExSmtpClient.SmtpClient.Submit(Boolean disableDelayedAck)
at Microsoft.Exchange.UM.UMCore.SmtpSubmissionHelper.SubmitMessage(MessageItem message, String senderAddress, String recipientAddress, OutboundConversionOptions submissionConversionOptions, InternalExchangeServer smtpServer)
at Microsoft.Exchange.UM.UMCore.SmtpSubmissionHelper.SubmitMessage(MessageItem message, String senderAddress, String recipientAddress, OutboundConversionOptions submissionConversionOptions, String requestId)
--- End of inner exception stack trace ---
Server stack trace:
at Microsoft.Exchange.UM.UMCore.SmtpSubmissionHelper.HandleTransientSmtpFailure(Exception e, InternalExchangeServer smtpServer, String recipientAddress)
at Microsoft.Exchange.UM.UMCore.SmtpSubmissionHelper.SubmitMessage(MessageItem message, String senderAddress, String recipientAddress, OutboundConversionOptions submissionConversionOptions, String requestId)
at Microsoft.Exchange.UM.UMCore.SmtpSubmitStage.InternalDoSynchronousWork()
at System.Runtime.Remoting.Messaging.StackBuilderSink._PrivateProcessMessage(IntPtr md, Object[] args, Object server, Int32 methodPtr, Boolean fExecuteInContext, Object[]& outArgs)
at System.Runtime.Remoting.Messaging.StackBuilderSink.AsyncProcessMessage(IMessage msg, IMessageSink replySink)
Exception rethrown at [0]:
at System.Runtime.Remoting.Proxies.RealProxy.EndInvokeHelper(Message reqMsg, Boolean bProxyCase)
at System.Runtime.Remoting.Proxies.RemotingProxy.Invoke(Object NotUsed, MessageData& msgData)
at Microsoft.Exchange.UM.UMCore.SynchronousPipelineStageBase.SynchronousWorkDelegate.EndInvoke(IAsyncResult result)
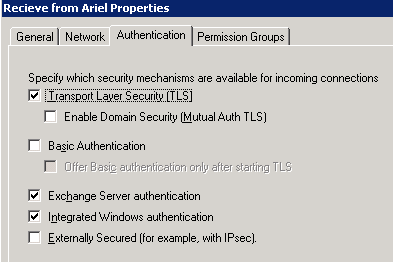
at Microsoft.Exchange.UM.UMCore.SynchronousPipelineStageBase.EndSynchronousWork(IAsyncResult r)" - The solution for this was to create a custom receive connector on the 2010 Hub transport role because the Default one had to be modified to excluded other addresses to properly receive from internet. The settings we have are General Tab > FQDN = internal FQDN(must have a certificate); Network tab > Receive mail from remote servers includes: Addresses of 2010 UM server, CAS server and 2007 CAS; Authentication Tab > Check TLS, Mutual Auth TLS, Exchange Server Authentication; Permission Groups Tab > Check all users.
Friday, June 15, 2012
Exchange 2007 and Exchange 2010 Upgrade issues
This post will highlight some of the errors and solutions we ran into in our upgrade process.
The first error we ran into after the installation and change of DNS addresses was the backup of the mail queues on the 2010 server because it was unable to send mail to the 2007 exchange HUB server to be delivered to mailboxes. The Queue was a next hop domain of hub version 8, Delivery type of SMTP Relay in Active Directory Site, the last error was 451 4.4.0 DNS query failed. The last error was:SMTPSEND.DNS.NonExisentDomain; nonexistent domain.
We ran the Mailflow Trouble shooting tool and it gave a couple of warnings regarding no pointer records that had not propagated yet.
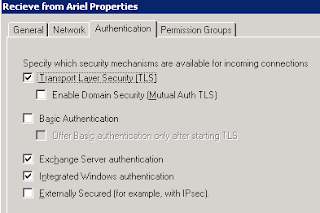
The solution ended up being related to the receive connectors. The basic concept is to ensure you have a receive connector on each exchange server that is configured to only include the other exchange server. DO NOT have any other of your receive connectors able to receive from an IP address scope that contains within it the other Exchange server AND has Anonymous Users not selected. An example of our receive connector on the Exchange 2007 server can be seen below.


 The second major issue we had was with ActiveSync and our mobile phones. Both Iphone and Android phones experienced errors of Invalid Usernames and passwords. We were also receiving Error:MisconfiguredDevice_Mbx in the IIS logs. This appears to be a common issue according to http://www.stevieg.org/2010/01/solving-iphone-and-exchange-20102007-coexistance-issues/.
The resolution is to run the command
The first error we ran into after the installation and change of DNS addresses was the backup of the mail queues on the 2010 server because it was unable to send mail to the 2007 exchange HUB server to be delivered to mailboxes. The Queue was a next hop domain of hub version 8, Delivery type of SMTP Relay in Active Directory Site, the last error was 451 4.4.0 DNS query failed. The last error was:SMTPSEND.DNS.NonExisentDomain; nonexistent domain.
We ran the Mailflow Trouble shooting tool and it gave a couple of warnings regarding no pointer records that had not propagated yet.
The solution ended up being related to the receive connectors. The basic concept is to ensure you have a receive connector on each exchange server that is configured to only include the other exchange server. DO NOT have any other of your receive connectors able to receive from an IP address scope that contains within it the other Exchange server AND has Anonymous Users not selected. An example of our receive connector on the Exchange 2007 server can be seen below.



The resolution is to run the command
Get-ActiveSyncVirtualDirectory -Server E2007CA | Set-ActiveSyncVirtualDirectory -ExternalURL:$null
 |
| Figure 5 |
This essentially sets up a proxy for the Activesync clients to the 2007 server. The URL folder from Server Configuration > Client Access > Server > ActiveSync will look like the figure 5.
- Authentication was set to Ignore Client Certificates and not allow Basic Authentication from the settings of the Client
- In the IIS folder settings we have Integrated Windows authentication enabled.
- We did temporarily enabled Basic authentication to set a default domain and disabled it; however I am not sure if this had any effect on the final solution.
One final note is that in the process of this some mobile clients updated server settings to legacy.domain.edu. On those few clients they might need to manual change their servers to webmail.domain.edu.
Thursday, June 14, 2012
Exchange 2007 to Exchange 2010 Upgrade/Migration
The past couple of days we have spent preparing and doing and upgrade/migration from Exchange 2007 On-Premise to Exchange 2010 On-Premise. All of this is in preparation to migrate voice-mail off of Call-Pilot and our Nortel PBX to Exchange Unified Messaging. That does was made largely because of the every increasing cost of maintenance and replacement wiring for the legacy phone switch. This post will work through the steps, errors and troubleshooting we went through to get Exchange 2010 up and working.
Our starting point is the configuration in figure 1. where all Exchange servers are running SP3 Rollup 6. In addition, all steps until Step # should be able to be completed during normal hours without downtime. This was importance for us because we don't have the redundant hardware or storage to create a replica of the exchange environment. We installed the new servers in a virtual environment.
 Your mail configuration should now be up and Exchange should be passing mail through the 2010 CAS server. I will do a follow up post that covers a couple of the problems we ran into along the way. Finally, here is an image of the environment after setup.
Here are a couple links to other useful resources when performing this upgrade.
http://blogs.catapultsystems.com/IT/archive/2010/02/17/preparing-for-the-transition-from-exchange-2007-to-exchange-2010-part-1-of-4.aspx
http://technet.microsoft.com/en-us/library/bb124350.aspx
http://www.simple-talk.com/sysadmin/exchange/upgrade-from-exchange-2007-to-exchange-2010---part-1/
http://blogs.technet.com/b/exchange/archive/2006/11/17/3397307.aspx
 |
| Figure 1. Starting Network Design |
- Provision a server in VMware
- Run the Exchange setup /prepareSchema on the Domain Controller that is SchemaMaster
- Run the Exchange setup /prepareAD against all domains in your environment. (We have 2, an empty upper root and another full one.)
Note: You will need to move the schema Master to the domain where the exchange server will be installed. Not doing so may result in the following error messages: Hat tip to here for the help
Error: Setup needs to contact the Active Directory schema master but this computer is not in the same Active Directory domain as the schema master (DC=muc,DC=prv). Click here for help... http://go.microsoft.com/fwlink/?linkid=30939&l=en&v=ExBPA.14&id=2376fec1-b9ce-44db-beb6-cb9ac4788988
Error: Setup encountered a problem while validating the state of Active Directory: Exchange organization-level objects have not been created, and setup cannot create them because the local computer is not in the same domain and site as the schema master. Run setup with the /prepareAD parameter on a computer in the domain muc and site Default-First-Site-Name, and wait for replication to complete. Click here for help... http://technet.microsoft.com/en-US/library/ms.exch.err.default(EXCHG.141).aspx?v=14.1.218.11&e=ms.exch.err.Ex28883C&l=0&cl=cp
- Run PS cmd- Add-WindowsFeature Web-WMI,Web-Asp-Net,Web-ISAPI-Filter,Web-Client-Auth,Web-Dir-Browsing,Web-Http-Errors,Web-Http-Logging,Web-Http-Redirect,Web-Http-Tracing,Web-Request-Monitor,Web-Static-Content on the exchange server
- Our original desire was to only install the CAS role. Due to the certificates we needed to request, we also needed to install the Hub Transport and UM roles while we were going through the setup. So total roles installed = CAS,HUB,UM
- Perform any Updates
- Request a UC SAN Certificate for the 2010 server: Do not include Federation service in your request. Use this article as a good example of how to do this in 2010.
- Note: We use Entrust for our certificates and I highly recommend their services. After authorization, we had access to a Certificate Management Service from which we can create, revoke and reuse certificates after they are purchased. With this we don't have to wait on authorization for every single certificate. Their support is great and they are cheaper than the major certificate vendor.
- Certificate Name of the UC SAN (Subject Alternate Name) certificate
- Common Name = webmail.domain.edu or mail.domain.edu whatever you have currently set your 2007 CAS to
- SAN = legacy.domain.edu (for redirection of 2007 mailboxes to 2007 CAS)
- SAN = autodiscover.mountunion.edu
- SAN = 2010ExchangeName.domain.domain.local
- SAN = domain.edu
- SAN = UM.domain.edu ( For UM roles when required) - Install the certificate by replying to the request in the GUI.
- Add the DNS entries for legacy.domain.edu to the DNS servers and have them mapped to the 2007 CAS server.
- Change firewall rules to allow access to the 2010 CAS server and allow the 2 Cas servers to talked to each other.
Everything up to this point should be able to be completed with no downtime - Change the DNS of the primary mail server and autodiscover to point to the new 2010 CAS server.
- Replace the current UC SAN certificate that is on the 2007 CAS.
- Common Name = legacy.domain.edu
- SAN = autodiscover.domain.edu
- SAN = 2007ServerName.domain.domain.local (This is critically to avoiding errors from Outlook Clients
- SAN = webmail.domain.edu
- The error received is if you don't have the proper private name is " Security Alert : Information you exchange with this site cannot be viewd or changed by others. However, there is a problem with this site's security certificate. The name on the security certificate is invalid or does not match the name of the site. - This will need to be generated by Powershell in 2007. The easiest way I found is to use a site like https://www.digicert.com/easy-csr/exchange2007.htm to generate the powershell to paste into the powershell command line.
- Take that CSR and submit it to your CA to get a certificate.
- Install the certificate with Import-ExchangeCertificate -Path C:\filename.cer
- Run a Get-ExchangeCertificate and copy the thumbprint you just installed.
- Do an Enable-ExchangeCertificate -Services "SMTP,IIS,POP,IMAP" and respond with the thumbprint.
- If you are looking for full information on the certificates you can run a Get-ExchangeCertificate | fl to see expiration dates and all SANs
- Make sure to change any spam filter rules to make 2010 the new primary place that mail passes through

Here are a couple links to other useful resources when performing this upgrade.
http://blogs.catapultsystems.com/IT/archive/2010/02/17/preparing-for-the-transition-from-exchange-2007-to-exchange-2010-part-1-of-4.aspx
http://technet.microsoft.com/en-us/library/bb124350.aspx
http://www.simple-talk.com/sysadmin/exchange/upgrade-from-exchange-2007-to-exchange-2010---part-1/
http://blogs.technet.com/b/exchange/archive/2006/11/17/3397307.aspx
Wednesday, March 7, 2012
Personal Goal Setting at Mount
The following was written as an email and sent to my peers out Mount as we prepare for the next budget year. Posting it here for archival purposes. Please note, that a lot of this was distilled from EntreLeadership podcast by Dave Ramsey, if you are interested for a much more in depth look at it please visit them.
It is the time of
year again where we are supposed to “make our goals” and the goals for the
department. I personally always have difficulty with this, and complain and
grumble because it seems we have to make them, not look at them and make them
again next year, so I figured I would do some research and understand why I
should actually care. Here are the
results of what I found that I figured I would share in case I am not the only
one who dislikes this time of the year.
The first thing I found is that our goals should actually be
tempered by a personal mission statement this is because something that says
who we are, and therefore also who we aren’t. It can basically become the
railroad tracks that are goals ride on to make sure we don’t get off track
chasing the endless amount of other things. It defines the general direction of
where you are heading and keeps you pointed there. It helps you to do what is
important so you don’t waste time doing the unimportant things. It helps you
find the things that fit you, and realize the things that might not fit you. In
essence, a mission statement should act as a filter by which you can look at
whatever activity you are doing and determine if that activity has a purpose in
your life, is it worth spending the time on.
More specifically, a mission statement should include 3
different areas:
- Skills and Abilities, or Competencies – The What
- Personality Traits --- The How
- Values, Dreams, Passions --- The Why
When looking at the specifics of these things items we all
have different strengths and weakness, or end concepts in each that we should
take into consideration. For example, though necessary, one of my strengths is
not have conversations with people where there is no clear intent, ie I don’t
general talk to people to “get to know them,” where other people in this
department are skilled at that and do a much better job at relating and
empathizing with people, but for me it means I probably wouldn’t be spending
time well if I volunteered at a counseling center talking with people.
The second part of the discussion the fails on the actual creation
of goals. When we think of goals, what do we think of? For me it is the stuff we have to do every day
to try and accomplish something, and because of this, we typically go from day
to day, ticket or request to ticket or request. Even though that may be a goal, it isn’t the
best way to think about a goal or to create them. The following method is
suggested to be better
1.
Dream – These are usually wishes that seldom
happen, and therefore dreamers have negative connotation. The dream is that
thing way high up the clouds that is super fuzzy and undefined. For example,
you might dream of being a millionaire.
2.
Vision – This is the dream pulled out of the
clouds. It is the dream in a more defined state. In our example, “millionaire”
= having one million dollars in the bank by the time I retire,( probably not
via winning the lottery)
3.
Goal – This is the vision that is ready to work.
It has been clarified and refined. In our example could be something like, no
debt and saving 15% of paycheck every month to reach 1 million by age 65.
As you see with goals that we typically do, “Save money”
odds are we wouldn’t be anywhere close to meeting our dream, which is why it is
important to go through the process and not just start with a goal.
It is also recommended that we make goals in the following
areas of life:

- Career
- Financial
- Spiritual
- Physical
- Intellectual
- Family
- Social
Having goals for all these helps keep your life in balance
and well rounded. Where if you were to completely ignore one area, you might “run
a flat”, and things would be a little shaky and noisy going along. Staying in
this condition to long will cause it to become the consuming factor and throw all
the other ones out of whack. That being said, you may have times where there is
an ebb and flow and one section gets more attention than others, it just
shouldn’t be consuming.
Another option that may be
beneficial is to use a grid like the following to help through the though
process of figuring out those goals. Good luck as we prepare for this next
year.
|
Dream
|
Vision
|
Goal
|
|
|
Career
|
|
|
|
|
Financial
|
|
|
|
|
Spiritual
|
|
|
|
|
Physical
|
|
|
|
|
Intellectual
|
|
|
|
|
Family
|
|
|
|
|
Social
|
|
|
|
Credit: A lot of this information was from the
EntreLeadership podcast by Dave Ramsey, so if you are curious, you can look
more up there.
Subscribe to:
Posts (Atom)