Showing posts with label Exchange 2007. Show all posts

Friday, June 15, 2012

Exchange 2007 and Exchange 2010 Upgrade issues

This post will highlight some of the errors and solutions we ran into in our upgrade process.

The first error we ran into after the installation and change of DNS addresses was the backup of the mail queues on the 2010 server because it was unable to send mail to the 2007 exchange HUB server to be delivered to mailboxes.  The Queue was a next hop domain of hub version 8, Delivery type of SMTP Relay in Active Directory Site, the last error was 451 4.4.0 DNS query failed. The last error was:SMTPSEND.DNS.NonExisentDomain; nonexistent domain.

We ran the Mailflow Trouble shooting tool and it gave a couple of warnings regarding no pointer records that had not propagated yet.

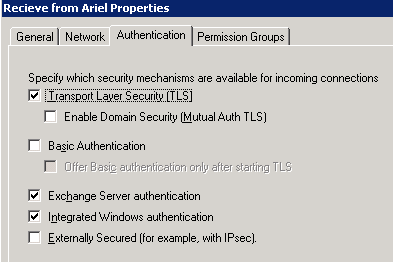
The solution ended up being related to the receive connectors. The basic concept is to ensure you have a receive connector on each exchange server that is configured to only include the other exchange server. DO NOT have any other of your receive connectors able to receive from an IP address scope that contains within it the other Exchange server AND has Anonymous Users not selected. An example of our receive connector on the Exchange 2007 server can be seen below.

The second major issue we had was with ActiveSync and our mobile phones. Both Iphone and Android phones experienced errors of Invalid Usernames and passwords. We were also receiving Error:MisconfiguredDevice_Mbx in the IIS logs. This appears to be a common issue according to http://www.stevieg.org/2010/01/solving-iphone-and-exchange-20102007-coexistance-issues/.

 The resolution is to run the command
Get-ActiveSyncVirtualDirectory -Server E2007CA | Set-ActiveSyncVirtualDirectory -ExternalURL:$null
 
Figure 5
This essentially sets up a proxy for the Activesync clients to the 2007 server. The URL folder from Server Configuration > Client Access > Server > ActiveSync will look like the figure 5. 
 
- Authentication was set to Ignore Client Certificates and not allow Basic Authentication from the settings of the Client 
- In the IIS folder settings we have Integrated Windows authentication enabled.
- We did temporarily enabled Basic authentication to set a default domain and disabled it; however I am not sure if this had any effect on the final solution.

One final note is that in the process of this some mobile clients updated server settings to legacy.domain.edu. On those few clients they might need to manual change their servers to webmail.domain.edu.

Thursday, June 14, 2012

Exchange 2007 to Exchange 2010 Upgrade/Migration

The past couple of days we have spent preparing and doing and upgrade/migration from Exchange 2007 On-Premise to Exchange 2010 On-Premise. All of this is in preparation to migrate voice-mail off of Call-Pilot and our Nortel PBX to Exchange Unified Messaging. That does was made largely because of the every increasing cost of maintenance and replacement wiring for the legacy phone switch. This post will work through the steps, errors and troubleshooting we went through to get Exchange 2010 up and working.

Figure 1. Starting Network Design
Our starting point is the configuration in figure 1. where all Exchange servers are running SP3 Rollup 6.  In addition, all steps until Step # should be able to be completed during normal hours without downtime. This was importance for us because we don't have the redundant hardware or storage to create a replica of the exchange environment. We installed the new servers in a virtual environment.
  1. Provision a server in VMware
  2. Run the Exchange setup /prepareSchema on the Domain Controller that is SchemaMaster
  3. Run the Exchange setup /prepareAD against all domains in your environment. (We have 2, an empty upper root and another full one.)

    Note: You will need to move the schema Master to the domain where the exchange server will be installed. Not doing so may result in the following error messages: Hat tip to here for the help

    Error: Setup needs to contact the Active Directory schema master but this computer is not in the same Active Directory domain as the schema master (DC=muc,DC=prv). Click here for help... http://go.microsoft.com/fwlink/?linkid=30939&l=en&v=ExBPA.14&id=2376fec1-b9ce-44db-beb6-cb9ac4788988

    Error: Setup encountered a problem while validating the state of Active Directory: Exchange organization-level objects have not been created, and setup cannot create them because the local computer is not in the same domain and site as the schema master.  Run setup with the /prepareAD parameter on a computer in the domain muc and site Default-First-Site-Name, and wait for replication to complete. Click here for help... http://technet.microsoft.com/en-US/library/ms.exch.err.default(EXCHG.141).aspx?v=14.1.218.11&e=ms.exch.err.Ex28883C&l=0&cl=cp 
     
  4.  Run PS cmd- Add-WindowsFeature Web-WMI,Web-Asp-Net,Web-ISAPI-Filter,Web-Client-Auth,Web-Dir-Browsing,Web-Http-Errors,Web-Http-Logging,Web-Http-Redirect,Web-Http-Tracing,Web-Request-Monitor,Web-Static-Content on the exchange server
  5.  Our original desire was to only install the CAS role. Due to the certificates we needed to request, we also needed to install the Hub Transport and UM roles while we were going through the setup. So total roles installed = CAS,HUB,UM
  6. Perform any Updates
  7. Request a UC SAN Certificate for the 2010 server: Do not include Federation service in your request. Use this article as a good example of how to do this in 2010.

    - Note: We use Entrust for our certificates and I highly recommend their services. After authorization, we had access to a Certificate Management Service from which we can create, revoke and reuse certificates after they are purchased. With this we don't have to wait on authorization for every single certificate. Their support is great and they are cheaper than the major certificate vendor.

    - Certificate Name of the UC SAN (Subject Alternate Name) certificate
    - Common Name = webmail.domain.edu or mail.domain.edu whatever you have currently set your 2007 CAS to
    - SAN = legacy.domain.edu (for redirection of 2007 mailboxes to 2007 CAS)
    - SAN = autodiscover.mountunion.edu
    - SAN = 2010ExchangeName.domain.domain.local
    - SAN = domain.edu
    - SAN = UM.domain.edu ( For UM roles when required)
  8. Install the certificate by replying to the request in the GUI.
  9. Add the DNS entries for legacy.domain.edu to the DNS servers and have them mapped to the 2007 CAS server.
  10. Change firewall rules to allow access to the 2010 CAS server and allow the 2 Cas servers to talked to each other.

    Everything up to this point should be able to be completed with no downtime
  11. Change the DNS of the primary mail server and autodiscover to point to the new 2010 CAS server.
  12. Replace the current UC SAN certificate that is on the 2007 CAS.
    - Common Name = legacy.domain.edu
    - SAN = autodiscover.domain.edu
    - SAN = 2007ServerName.domain.domain.local (This is critically to avoiding errors from Outlook Clients
    - SAN = webmail.domain.edu

    - The error received is if you don't have the proper private name is " Security Alert : Information you exchange with this site cannot be viewd or changed by others. However, there is a problem with this site's security certificate. The name on the security certificate is invalid or does not match the name of the site.
  13. This will need to be generated by Powershell in 2007. The easiest way I found is to use a site like https://www.digicert.com/easy-csr/exchange2007.htm to generate the powershell to paste into the powershell command line.
  14. Take that CSR and submit it to your CA to get a certificate.
  15. Install the certificate with Import-ExchangeCertificate -Path C:\filename.cer
  16. Run a Get-ExchangeCertificate and copy the thumbprint you just installed.
  17. Do an Enable-ExchangeCertificate -Services "SMTP,IIS,POP,IMAP" and respond with the thumbprint.
  18. If you are looking for full information on the certificates you can run a Get-ExchangeCertificate | fl to see expiration dates and all SANs
  19. Make sure to change any spam filter rules to make 2010 the new primary place that mail passes through
Your mail configuration should now be up and Exchange should be passing mail through the 2010 CAS server.   I will do a follow up post that covers a couple of the problems we ran into along the way. Finally, here is an image of the environment after setup.

Here are a couple links to other useful resources when performing this upgrade.

http://blogs.catapultsystems.com/IT/archive/2010/02/17/preparing-for-the-transition-from-exchange-2007-to-exchange-2010-part-1-of-4.aspx


 http://technet.microsoft.com/en-us/library/bb124350.aspx


http://www.simple-talk.com/sysadmin/exchange/upgrade-from-exchange-2007-to-exchange-2010---part-1/ 


http://blogs.technet.com/b/exchange/archive/2006/11/17/3397307.aspx

Tuesday, February 14, 2012

Configuring Encryption with a PGP Universal Gateway Server, Exchange, and Barracuda Spam Filter

After quite a bit more troubleshooting and a call to the vendor who sold us the PGP gateway product we have been able to get it working. We also learned that our spam filter, a Barracuda 400 antivirus device, is cable of also functioning as an email encryption gateway and is easier for us to because of a few key features. In this post, I will try to outline our original mail-flow setup, and our final setup as well as options along the way if you don't have both.


Image 1 - Pre Encryption mail flow
Pre-Encryption Mail Flow is shown in Image 1. Inbound mail travels through our spam filter, to our exchange 2007 CAS server and then to the mailbox and client. Outbound we were bypassing the spam filter and using exchange to look up mail hosts and email directly to the other MX hosts.

Post Encryption Solutions - In our original implementation plans, we were looking at 2 separate reasons for encrypting of which PGP was the most obvious option. The 2 reasons were

  •  1st the need for an email based encryption with a web based solution so that we could communicate securely with others who didn't have an encryption solution. 
  • 2nd was the need for disk encryption for our laptop clients. PGP would meet this need via providing both a universal gateway server, as well as desktop clients that can manage the disk encryption.


What we discovered - During the implementation and configuration we discovered a few things that changed our implementation plans to accommodate them.

  • Our barracuda spam and virus firewall now supports acting as a web based encryption agent. You can filter based on content filtering rules in the barracuda just like in the PGP Universal Server. For example, we have a rule that any message flowing through the barracuda will encrypt messages containing [encrypt]. This is also possible in the universal server, but the PGP server is case sensitive while the barracuda is not.
  • After trying to put the PGP server in mail flow between exchange and the barracuda we started having issues with backed up mail queues in exchange. The PGP system seems to have some rather strict limitations on messages per connection and rate control that there are no options to address to allow more messages
  • A huge feature from our perspective was because the barracuda encryption service hosts the encrypted message in their cloud based system, in doing so; they provide the capabilities to allow users to self service password reset. From my discussion with our vendor this is a huge advantage because the PGP server requires administrators to reset user's passwords.
  • As a benefit of having both the barracuda and PGP server and clients, we were able to come to a final deployment decision where the barracuda would do the web gateway encryption for the majority of campus. On select users that would require disk encryption, we would install the client because those users are also people who would find the value of client to client mail encryption. 
Post Encryption Mail Flow and Implementation - I have displayed a couple of the different options in Image 2 for outbound setups.
Image 2
Depending on if your client is a PGP desktop user or not both the first and second mail flows in this image can be implemented at the same time.

Post install - Here are the instructions of how it was done.

Exchange Smarthost to gateway example

  1. In Exchange modify your Send Connector that forwards email to the internet. For us, it is Organization Configuration > Hub Transport > Send Connectors > Send to Internet. Usually this is the SMTP space that matches the address of *  In the network tab you need to configure it to send to the mail server doing the web based encryption, this can be either barracuda like in our case or simply the PGP gateway.
  2. To configure the PGP gateway, log into the web interface. Go to Mail > Proxies > then click on the SMTP Proxy. If the PGP server will be in the mail flow like option 3 above, you need to change the SMTP Proxy type to Unified. In the Outbound mail designated source IPs: add the IP address of your Exchange server. If the PGP server is your last mail flow stop before the Internet, choose Send mail directly to recipient mail server. If you have another outbound mail server like our barracuda, choose Send all outbound mail to relay and enter the IP of your next hop. For inbound mail enter the IP address of your exchange server in Mailserver hostname.
  3. In addition, if you are passing through the PGP server for inbound mail, you will need to configure Mail > Mail Routes and add your domain and Exchange server IP address. With the exception of policy setup, this should complete the configuration of the PGP Universal Server
  4. For the PGP policy setup you can modify the Outbound rule applicable to Server, Client under Mail > Mail Policy.  We created a custom policy and placed it just prior to the Sign + Encrypt Buttons rule that is a default rule. You can see the rule setup in the image that would encrypt messages based on the subject containing [encrypt], a social security number, and a federal tax.  In the actions, you want to encrypt on the recipient's key or send via Web Messenger, if using the PGP Web Messenger. If you are using something like the Barracuda to do encryption but you have the PGP server in the mail flow, you can set this to send unencrypted because it will be encrypted by the barracuda.
    PGP encryption policy rule
  5. If you also have a Barracuda to configure the outbound mail login to the web interface. Go to Basic > Outbound > Relay Using Trusted IP/Range, and add the IP address of either your PGP or Exchange server, whichever will be sending mail. This only enables outbound mail not the encryption portions.
  6. In the Barracuda, Go to Domains > Domain Manager > Manage Domain of your domain. In the Advanced > Encryption menu you can upload a custom image to appear in the emails.
  7. In the Barracuda, Go to Block/Accept > Content Filtering. Change the content filters to include something like a pattern of [\encrypt\] (which matches on [encrypt]), set Inbound Off, and Outbound to Encrypt, with Subject checked.

Best of luck with your install.