Friday, February 24, 2012

DIY: A More Lethal Rat Trap

This is not typically the type of article I write and has nothing to do with technology at Mount, but it was an issue I ran into recently.

I live in a farmhouse built in the 1860s, and while no house is rodent impervious, we definitely have our fair share. Recently, we have had problems with 2 different rats. One was stealing fruit from our fruit bowl, while the other was eating potatoes saved from the summer harvest.

I had set some traps to eliminate these rodents from stealing food and leaving droppings laying around. The problem was the rat was stealing any bait I used that was just sitting on the trigger in the traditional manner. To resolve this I started to use bait that I tied to the trigger. 
Rats are particular and cautious about their food, so in my case it was easy to use a needle and thread to sew the grapes and a chunk of potato to the trigger.

After doing this the rat started setting the trap off and not stealing the bait, but was also not getting caught in the trap. I tried several different traps over the course of a few days and all of them would get set off with no rodent caught.

After talking to some people who have lived in old houses far longer than myself, I was able to develop a solution that could be easily installed on existing traps models that would make them more lethal. I would take small nails and place them through the trap pointy side up in a manner that doesn't impede the normal operation of the trap.


Since using these customized traps, they have killed the rats the first time they were triggered. It seems before the rats were actually getting caught in the trap and escaping. With the nails sticking out of the trap, the rat gets caught on the nail while trying to escape, so even if the manage to get out of the clamp, they end up tearing themselves on the nail and die within a foot or two of the trap by bleeding out.

Unfortunately it means this method is a little more violent, but is the only way I have found to successfully permanently remove the rodents.

Tuesday, February 14, 2012

Configuring Encryption with a PGP Universal Gateway Server, Exchange, and Barracuda Spam Filter

After quite a bit more troubleshooting and a call to the vendor who sold us the PGP gateway product we have been able to get it working. We also learned that our spam filter, a Barracuda 400 antivirus device, is cable of also functioning as an email encryption gateway and is easier for us to because of a few key features. In this post, I will try to outline our original mail-flow setup, and our final setup as well as options along the way if you don't have both.


Image 1 - Pre Encryption mail flow
Pre-Encryption Mail Flow is shown in Image 1. Inbound mail travels through our spam filter, to our exchange 2007 CAS server and then to the mailbox and client. Outbound we were bypassing the spam filter and using exchange to look up mail hosts and email directly to the other MX hosts.

Post Encryption Solutions - In our original implementation plans, we were looking at 2 separate reasons for encrypting of which PGP was the most obvious option. The 2 reasons were

  •  1st the need for an email based encryption with a web based solution so that we could communicate securely with others who didn't have an encryption solution. 
  • 2nd was the need for disk encryption for our laptop clients. PGP would meet this need via providing both a universal gateway server, as well as desktop clients that can manage the disk encryption.


What we discovered - During the implementation and configuration we discovered a few things that changed our implementation plans to accommodate them.

  • Our barracuda spam and virus firewall now supports acting as a web based encryption agent. You can filter based on content filtering rules in the barracuda just like in the PGP Universal Server. For example, we have a rule that any message flowing through the barracuda will encrypt messages containing [encrypt]. This is also possible in the universal server, but the PGP server is case sensitive while the barracuda is not.
  • After trying to put the PGP server in mail flow between exchange and the barracuda we started having issues with backed up mail queues in exchange. The PGP system seems to have some rather strict limitations on messages per connection and rate control that there are no options to address to allow more messages
  • A huge feature from our perspective was because the barracuda encryption service hosts the encrypted message in their cloud based system, in doing so; they provide the capabilities to allow users to self service password reset. From my discussion with our vendor this is a huge advantage because the PGP server requires administrators to reset user's passwords.
  • As a benefit of having both the barracuda and PGP server and clients, we were able to come to a final deployment decision where the barracuda would do the web gateway encryption for the majority of campus. On select users that would require disk encryption, we would install the client because those users are also people who would find the value of client to client mail encryption. 
Post Encryption Mail Flow and Implementation - I have displayed a couple of the different options in Image 2 for outbound setups.
Image 2
Depending on if your client is a PGP desktop user or not both the first and second mail flows in this image can be implemented at the same time.

Post install - Here are the instructions of how it was done.

Exchange Smarthost to gateway example

  1. In Exchange modify your Send Connector that forwards email to the internet. For us, it is Organization Configuration > Hub Transport > Send Connectors > Send to Internet. Usually this is the SMTP space that matches the address of *  In the network tab you need to configure it to send to the mail server doing the web based encryption, this can be either barracuda like in our case or simply the PGP gateway.
  2. To configure the PGP gateway, log into the web interface. Go to Mail > Proxies > then click on the SMTP Proxy. If the PGP server will be in the mail flow like option 3 above, you need to change the SMTP Proxy type to Unified. In the Outbound mail designated source IPs: add the IP address of your Exchange server. If the PGP server is your last mail flow stop before the Internet, choose Send mail directly to recipient mail server. If you have another outbound mail server like our barracuda, choose Send all outbound mail to relay and enter the IP of your next hop. For inbound mail enter the IP address of your exchange server in Mailserver hostname.
  3. In addition, if you are passing through the PGP server for inbound mail, you will need to configure Mail > Mail Routes and add your domain and Exchange server IP address. With the exception of policy setup, this should complete the configuration of the PGP Universal Server
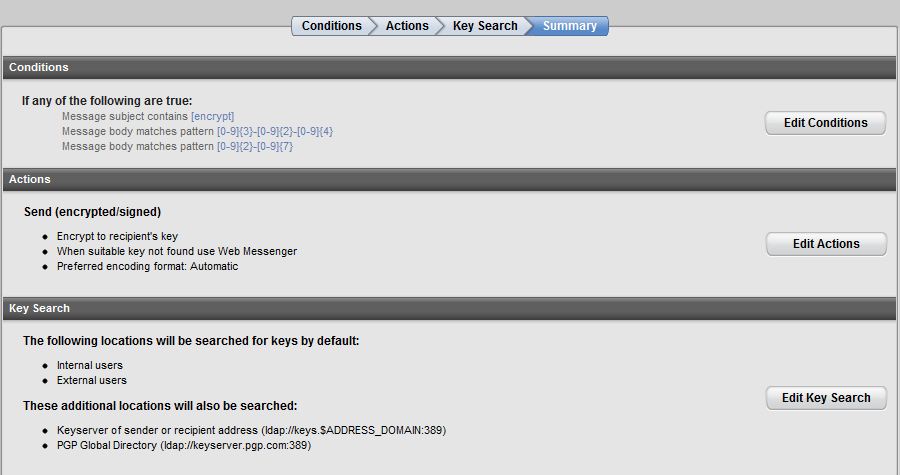
  4. For the PGP policy setup you can modify the Outbound rule applicable to Server, Client under Mail > Mail Policy.  We created a custom policy and placed it just prior to the Sign + Encrypt Buttons rule that is a default rule. You can see the rule setup in the image that would encrypt messages based on the subject containing [encrypt], a social security number, and a federal tax.  In the actions, you want to encrypt on the recipient's key or send via Web Messenger, if using the PGP Web Messenger. If you are using something like the Barracuda to do encryption but you have the PGP server in the mail flow, you can set this to send unencrypted because it will be encrypted by the barracuda.
    PGP encryption policy rule
  5. If you also have a Barracuda to configure the outbound mail login to the web interface. Go to Basic > Outbound > Relay Using Trusted IP/Range, and add the IP address of either your PGP or Exchange server, whichever will be sending mail. This only enables outbound mail not the encryption portions.
  6. In the Barracuda, Go to Domains > Domain Manager > Manage Domain of your domain. In the Advanced > Encryption menu you can upload a custom image to appear in the emails.
  7. In the Barracuda, Go to Block/Accept > Content Filtering. Change the content filters to include something like a pattern of [\encrypt\] (which matches on [encrypt]), set Inbound Off, and Outbound to Encrypt, with Subject checked.

Best of luck with your install.

Pocket reader connectivity in CBORD's CSGold

The following article will document the potential issues and steps required to verify the connectivity of Cbord's CSGold Pocket Reader. We have one of these devices, specifically an MC70, and recently had issues where the device would not communicate with the server and was permanently in an offline state.


  1. Step one is to ensure that the wireless on the device is connecting to your wireless network and you have network access. To accomplish this you can use the wireless network configuration tools. When completed the connectivity icon at the top of the reader should look like figure 1 with the arrows.
  2. You next need to ensure that the port and server the pocket reader is pointing at to connect to is the IP address of your TPS server. The port needs to be 20000 + the node sid of the line driver of the pocket reader. For example, our line driver node sid is 9001, this means that our port needs to be 29001.
  3. You need to confirm the MAC address that the reader displays in Info > Device Info is identical to the MAC address in the TPS configuration for the location you have the reader set to.  I have discovered this is case sensitive.
  4. To obtain additional information, stop and restart the Pocket Reader MGR with a debug level of 5.
  5. Look on the TPS server in Goldserver\logs folder for a file named LineDriverNODESID(timeDATE).out or .log
  6. You can open this with notepad and look at any connection attempts from the pocket reader.
  7. In addition, you could also do a netstat -a -n | grep port (in my example 29001) and it will show incoming attempts for the server.
  8. If you see nothing here be sure to check for any firewall or ACL rules between your device and the server.
With these steps in place the pocket reader should be getting that little green triangle in the application instead of the red triangle. Best of luck.

Thursday, January 26, 2012

Netsight Management/ NAC upgrade

I recently attempted to upgrade our network equipment to the newest version 4.2. In doing so, I received several errors that the servers were out of space and could not be upgraded. After a call to Enterasys support, we identified some files are locations that could be safely removed to free up space for the install.
The following instructions and locations are for the virtual images running in VMware.

DISCLAIMER: Before trying any of the following, if you are unsure about this please consult support to ensure you will not damage your system, or at very least make a snapshot you can revert back to.


  1. Step was upgrade Wireless Advanced Services if you have it.
  2. On Console go to the folder /usr/local/Enterasys_Networks/NetSight if there is a folder called .installer, this should be able to be deleted. Next if you go to /usr/local/Enterasys_Networks/NetSight/appdata/logs, it should be safe to delete some of the older log files to free up space.
  3. On the NAC systems, a lack of space was because of the file stats.out located at /opt/nac/server. It is safe to delete this file and it is probably quite large take up the majority of the space on that partition.
With these done, chmod 777 the installer files and install them, and hopefully everything will go well.

Good Luck


Monday, January 23, 2012

PGP Universal Gateway Server

We are in the process of deploying a PGP Universal server to allow encrypted messages to be sent to people from on-campus. The way the licensing works for PGP, there are a couple of different setup methods that have different implications.

  1. You purchase the system based on the number of Desktop clients that will have PGP desktop installed.
  2. To do desktop encryption, that client will need a Desktop license and have it installed
  3. To send encrypted email between internal users uses will need a desktop license and to have it installed
  4. To send encrypted emails externally - ultimately only 1 desktop license is needed for unlimited users
During implementation of the external gateway, we have experienced a couple of errors. One error in particular is receiving warnings that our ticket is not trusted even though we purchased the certificate from Entrust. Luckily we found a post by Ian Kirk who had already solved it the problem.  This article will be going through his steps and adding screenshots for internal documentation purposes.

Step 2
Step 1

  1. Log into the PGP universal server as an admin and go to Keys > Trusted Keys.
  2. Scroll to the bottom of that page and select Add Trusted Key. 
  3. Paste the public root key from entrust  and choose Trust key for verifying SSL/TLS and Trust key for verifying mail.
  4. Do the same for the Intermediate key.
  5. Go to Services > Web Messenger and Disable and Re-enable the Service.

Step 3.


This seems to have resolved the prompts that the site and keys were trusted. That said, more setup needs to occur because mail is not being encrypted when sent yet based on tests.

Creating a Campus Online Directory

At Mount one of the projects we did was to create an accurate up to date online directory. This would expose directory data in an easily searchable format.  It was required to be able to search via Name, Title or Department. It was also required that we had 2 versions:

  • One for Internal Audiences that includes student information, Fac/Staff Home addresses and Phones
  • One for External Audiences that  includes Campus Phone, Address, Titles, Departments, and Email
  • Additional Request was to ensure Exchange was updated with the latest information
The key aspect of this project was to figure out how the information would flow to ensure it was up to date particularly given the delay of information transmission between various departments internally. The systems and people involved in the process were as follows.

  • Powercampus (Our ERP) this is supposed to be the master database that is most correct and where all data comes from
  • Active Directory - In order to get exchange updated the information need to end up here. We also decided that the information displayed on the web should come from here to ensure our directory is current for security purposes.
  • Human Resources - Responsible for making changes of Fac/Staff info and generating ID information in powercampus
  • IT - responsible for running the import/export of data and creating new network accounts based on information from HR
Below is the Data Flow Diagram of the 3 functions of that would occur in the online directory process.

Wednesday, January 18, 2012

How to Bypass Wikipedia Blackout

Today is January 18th, and to fight the current proposed legislation PIPA and SOPA which would restrict online freedom of information by giving the government the ability to break portions of the internet under the guise of stopping piracy many large websites are blacking out their information. Wikipedia is among these and I fully support and encourage you to call your representatives or sign any of the petitions to fight this legislation including the one at https://www.google.com/landing/takeaction/.

That being said, if you need to bypass the blackout for today to use wikipedia, it appears fairly easy to do so since it is only using Java to redirect. Here are directions for 3 browsers(Internet Explorers experience will be the cumbersome):
Chrome + NotScript
1.Chrome - Install an extension called Notscripts and block wikipedia from running as shown .
2. Firefox Install the Addon called NoScript and again block wikipedia from running
3. Internet Explorer - Go to Internet Options > Security > Internet Zone > Click Custom Level. Scroll down the list until you find Scripting > Active Scripting. Set this to prompt or Disable. Now when you go to the Wikipedia page don't let it run scripts.

Please note that allow scripts to run is required for many of the features on many pages to work as intended. So you may have to allow or block sites from running scripts as needed. The major benefit of this is it will prevent the majority of malware attacks on you because those bad things usually now require scripting to work correctly so this is more secure. As typical though if you are normal visiting known good sites there is that trade off of usability so you may want to use Chrome or firefox and just allow scripting on those known sites.

EDIT: Also found from Wikipedia itself the following bypass methods

Are there ways to circumvent the read blackout?

The community has asked us to preserve emergency access options. The following methods will remain available to access content:
  • Disabling JavaScript in your browser
  • Using bookmarklets or other tools to unhide the content
  • Visiting the mobile site at http://en.m.wikipedia.org/
  • Accessing site content via the API
  • Appending ?banner=none to the end of page URLs.
As noted above, the mobile site will be available, but will display a banner pointing people to ways to protest SOPA/PIPA.